Selection of Music Videos
IDEA
A selection of live performance music videos performed in the TV studio with two different performers, showcasing my technical skills through camera shots, lighting and post production editing.
Performer 1 : Ellicia Smith
Performer 2 : Maz Corry & Simon Kemp
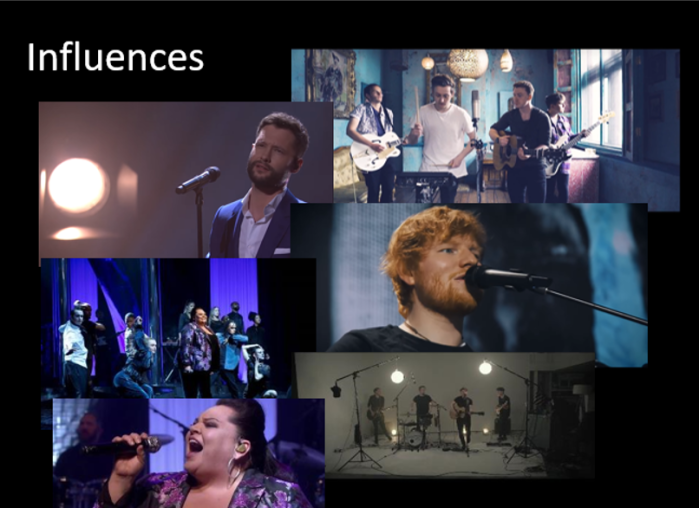
Influences
Primary Research
Focus Group – The first stage to the research process was a focus group with fellow students from Stratford and Solihull College which took place in the TV Studio. This was mainly an opportunity to discuss our initial ideas with other people, and listen to feedback on our ideas to develop and improve them. I knew that I had in mind that I wanted film and do something in the TV Studio for my FMP as this is where I work best, and is an opportunity to showcase my skills as a technician.
Main Feedback/Discussion
- Ensuring the sound quality for the live performance is good – Its important to get this right as its a huge part of the video that will be noticeable if the performer dosen’t sound good.
- One student spoke how its important to understand you’re performer so you can match the style of filming/lighting etc to their performance.
- Experiment with Lighting – Don’t just use the basic studio lighting rig, do something different to what you would usually do for a performance situation.
- Take a listen to the song the performer is going to sing and speak with them how they might want it filmed to help give you ideas.
- Presenter – Would someone presenting the performer before they perform work well like a ‘Top of the Pops’ style show, which was in face one of my original influences.
Audience – Depending on the style of the music video, a studio audience might work. For example if the performer was on a stage in the studio this would work nicely, however if it was more of an acoustic session than this wouldn’t be suited. An example of an acoustic session is like this performance of ‘Can You Feel The Love Tonight’. Having no audience in the video also allows the person watching to have full attention on the performer and understanding the relationship the singer and pianist have with one another.
Lighting/Stage Design
The research I concluded was experimentation where I set up potential set designs I could use for my two performers I am using to record a live performance music video. As you can see from the image below, my first set idea was to simply have a row of par can lights and the two moving lights surrounding the front of the singer all focused onto the performer. The first performer I have called Ellicia is going to be singing a musical number from the show Legally Blonde which is very much associated with the colour pink. Therefore I want to replicate this by mainly using this colour to light up the performer as well as a little natural light so she isn’t fully lit with pink.

The second design I had was using the two trusses we have in the Studio and rig par cans on each side and position one moving light either side at the bottom of the trusses, again positioned towards the performer. What I mainly liked from this was focusing the colour as side light onto the singer rather than from the floor in my previous design. The only concern I had with the lighting for this is that it looks quite dark on screen and could probably do with more light to brighten up the image. When focusing the two fresnel lights I planned to use as natural night on the performer, this created two shadows which were projected onto the backdrop which can be seen clearly towards the left of the image below. In order to avoid this, I need to bring both of the lights further forward which will then be focused more towards the floor which will get rid of the shadows on the backdrop.


Music Video Analysis
Leading up to my music session recording with Simon Kemp, I have been watching a variety of acoustic type live performance sessions to give me an influence into how they are professionally filmed. One that stood out to me was Christina Perri’s ‘a thousand years’ which is beautifully put together through a variety of composed shots that I absolutely love. Christina is accompanied by a pianist and guitarist.

Opening Shot – A clear wide shot image of Christina Perri slightly left to the centre of the frame, naturally lite. We see this opening shot so we understand she is in the spotlight and this is her moment

This shot clearly shows the artist’s relationship with the musician. The guitarist’s face is only slightly shown to us in the shot to portray the key focus of the music video is on Christina

Medium Close up – Revealing the musicians identity, naturally lite with soft light to match the relaxation of the song which helps to create the theme/style of the music video

Medium Close Up – Revealing the musicians identity, specifically lite on him as we see him submerged in darkness within the studio
Secondary Research
Youtube Videos
As part of my secondary research I watched this youtube video from Kriscoart who goes into detail on a variety of different things that you have to consider when it comes to shooting a live performance music video. The main elements that were covered were getting creative with lighting, matching the vibe of the artist and the tone of the song, getting into the flow of the artist and extracting the themes from the song for filming.The main thing I grasped from watching the video, is how important it is to understand and know the artist you are working on filming with.
Matching the artists vibe with a suitable style of music video take is essential and expressing their personality and the message they are trying to portray in their music is also important. Going into a shoot with ideas from others peoples work which you want to use for an artists music video should not be done as if the style of video your going for dosen’t suit the performer, the video can easily become awkward and seem very weird for people to watch. This is why you have to allow time to plan and start thinking about how your going to go about filming your artist at the very first stages of the production.
The second youtube video I watched was focused more on the camera set up for filming and the different shot types. In the video, the creator has based it around filming for a band however this can be applied for any performer. One thing that I learnt from the video was about the camera set up by having one main camera as a basic wide shot of the performer, and one or two other cameras to get close up shots of individual band members that can be used as cut aways to and from the main shot in the final edit of the video.


Audio/Sound
As I am shooting a live performance, the audio of the video is very important which is why as part of my research I have looked int which microphones are best suited to use to record my performers. The main two microphones that are available for us to use in the studio is a Shure SM58 and the Sennheiser E835 which are both very similar microphones but obviously from different audio companies.
Shure SM58 – For a long time now, the Shure SM58 has seen to be the legendary crown of live performance and is an ideal choice for a professional vocal artist. The microphone is tuned to accentuate the warmth and clarity of lead and backing vocals. It is also targeted to tailor the main sound source and will minimize background noise.

Main Features
- Frequency response tailored for vocals, with brightened midrange and bass rolloff
- Uniform cardioid pickup pattern isolates the main sound source and minimizes background noise
- Pneumatic shock-mount system cuts down handling noise
- Effective, built-in spherical wind and pop filter
- Supplied with break-resistant stand adapter which rotates 180 degrees
- Legendary Shure quality, ruggedness and reliability
- Cardioid (unidirectional) dynamic
- Frequency response: 50 to 15,000 Hz
Sennheiser E835 – Has a high-end boost as well as better mid-range when compared to the Shure SM58, and it sounds better without any EQ applied to it. However, the Shure SM58 is better for hard-screaming vocals and also has a more durable build. This microphone has a mid-range and high-end boost, plus a bass roll-off which is great for making vocals sound more natural and warm plus it doesn’t need much EQ’ing for it to sound great.
Main Features
- Lead vocal stage mic, designed to perform under pressure
- SPL rating in excess of 150dB can take your loudest signals
- Internal shockmount keeps handling noise low
- Designed to get a consistent performance despite its position
- Cardioid pickup pattern for outstanding feedback rejection

Lighting – https://lightsounds.com.au/top-10-tips-on-lighting-up-your-band-or-performance/
Mood and Drama
Reading this article from Lightsounds, their are many different ways a performer can be lite instead of standard ordinary lighting. Different colours can add mood and intensity to a show. Using darker colours like blue or violet for a dramatic blues effect or colours like amber or red will add energy to the performance. The light source would usually be a par can or a wash led bar which can be placed in different locations e.g. shining from the side onto the performers to add another dimension of colour to the show.
Drawing attention – Always make sure the lead performer or singer is washed by a brighter colour than the rest of the band to draw attention to them. If there is no lead performer as such, then it is recommended all members of the band to be highlighted by a brighter colour and have a clear contrast with the background lighting in terms of colour and brightness, i.e. background is to be generally darker and lower tones of colour than the performers.
Silhouettes – Lights can be projected from behind the performer to create a silhouette, adding mystery and drama to the band or musician selected. A suggestion to make things more interesting is to start the show with backlighting (and no spotlight on the lead) and progress to lighting them up a few seconds through the performance when the music picks up. This would create a more dramatic effect and heighten the suspense instead of having static lighting across the entirety of the performance.

Moving Heads – Moving heads are a fantastic option to add to a performance. They add movement, colour and shapes (gobos) to the overall effect making it look like a top notch production. You can place two or four moving heads on both sides of the stage around or behind you. They can rapidly change colours and direction as well as point to the backdrop and project gobos which could rotate or prism depending on the capabilities of the moving head that you’ve got.
This shows all of the creative possibilities when it comes to lighting. Unfortanetly it does all come down to a budget and what equipment is available to you, but experimenting with these different techniques with the gear you have is important and can help make my FMP just that little bit better.
Location: TV Studio at Stratford upon Avon College

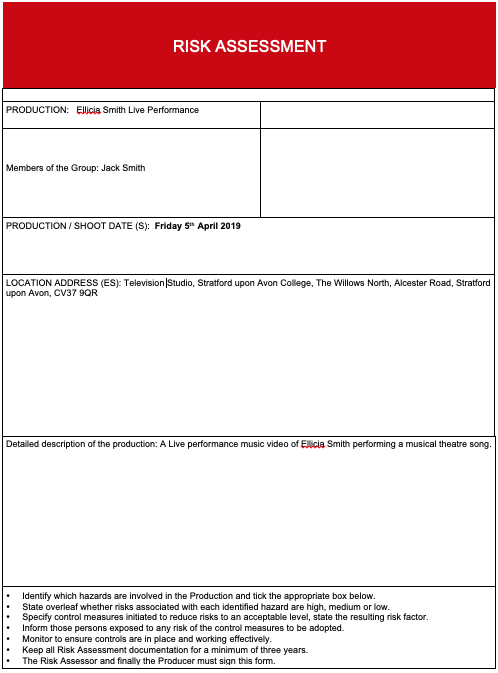
Ellicia Smith Studio Pre-Production
TV Studio Crew List
Director & Lighting: Jack Smith Floor Manager: Rufus Barker
Vision Mixer: Meg Crossley Sound: Jack Dewar & Bartek Rojek
Camera 1 – Tom Smith Camera 2 – Harry Allford
Camera 3 – Matthew Morgan Cable Basher: Ben Gibson
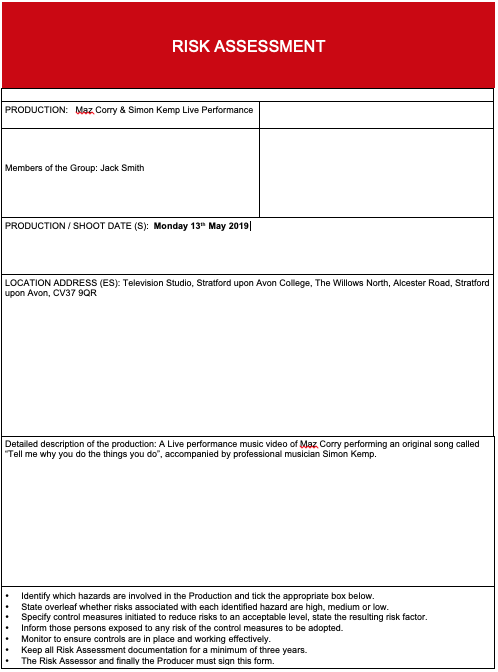
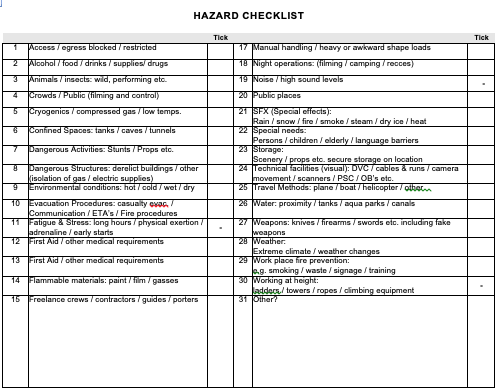
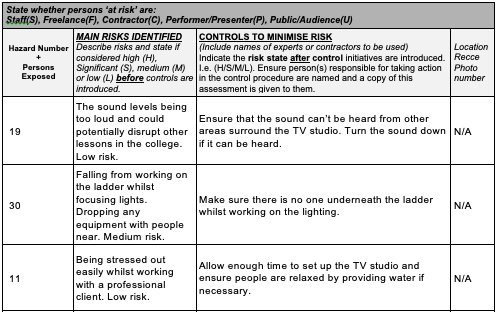
Risk Assessment
Maz Corry & Simon Kemp Pre-Production
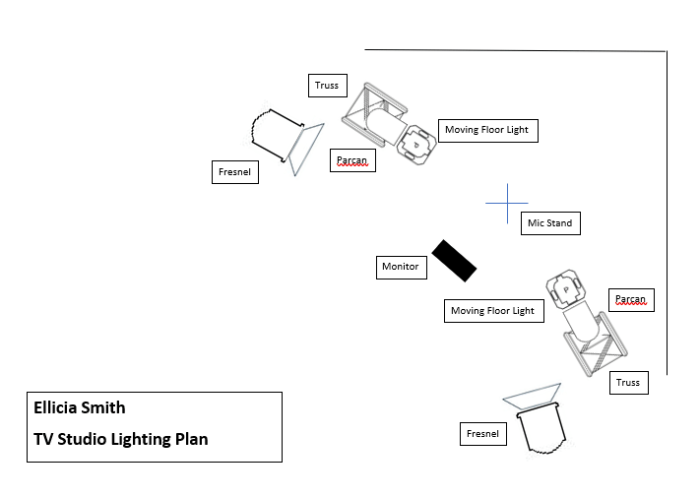
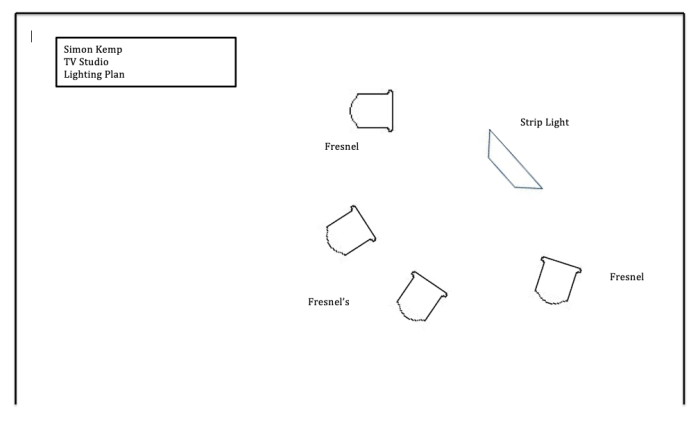
Studio Lighting Plan
TV Studio Crew List
Director/Floor Manager/Lighting: Jack Smith Vision Mixer: Meg Crossley
Assistant Director: Harriet Beddow Sound: Jack Dewar & Bartek Rojek
Camera 1 – Tom Smith Camera 2 – Alfie Bell
Camera 3 – Rufus Barker
Risk Assessment